
Support & Setup Guide
Everything you need to get DocAccess running on your website
Setting Up DocAccess on your Website
Important: a DocAccess account is required to use the helper script on your site. Create an account if you don't have one.
What is the DocAccess Helper Script?
The DocAccess helper script is a lightweight JavaScript file that enables accessible document viewing on your website. It can be added in two ways:
Option 1: Standard HTML (Recommended)
Option 2: Dynamic JavaScript
If your CMS doesn't allow direct HTML in the header, you can use this JavaScript approach:
Important: Install the script exactly as provided. Please do not modify, self-host, bundle, minify, wrap, or otherwise alter the DocAccess helper script or its loading behavior. Modified implementations are not supported and may interfere with PDF detection, accessible viewing, security updates, and future compatibility.
When the code is added to the site's header, it:
- Helps detect PDF links on your website to assist your administrator in inventorying your documents
- DocAccess will not otherwise modify the website
Once activated by your site administrator, the helper script will then:
- Checks links against its manifest to identify DocAccess-enabled documents
- For those enabled documents, it provides users with an accessible viewing option instead of traditional downloads, ensuring compatibility with screen readers and assistive technologies, either by updating links or adding a click behavior
- Contents are loaded either in a new tab or in a lightbox secured by an iframe, to isolate the accessible viewing application from your website.
Power Users: Test via Bookmarklets
Bookmarklets allow you to test DocAccess functionality on any website without permanently installing the helper script. This is useful for demonstrations, testing, or troubleshooting.
How to Install Bookmarklets
- Make your browser's bookmarks bar visible (Ctrl+Shift+B on Windows/Linux, Cmd+Shift+B on Mac)
- Drag and drop the bookmarklet buttons below to your bookmarks bar
- Visit any website and click the bookmarklet to activate DocAccess temporarily
Available Bookmarklets
1. Standard DocAccess (DA)
Simulates normal helper script behavior - activates document links and submits new links to DocAccess for processing.
Drag this button to your bookmarks bar
2. DocAccess with Visual Overlay (DA Overlay)
Same functionality as the standard bookmarklet, but adds colorful visual indicators showing the status of documents on the page. Perfect for diagnostics and demonstrations.
Drag this button to your bookmarks bar
Usage Tips
- Testing: Use bookmarklets to test how DocAccess will work on a site before permanent installation
- Demonstrations: Show clients or stakeholders how DocAccess enhances their documents
- Diagnostics: The overlay version helps identify which documents are already processed
- Temporary: Effects only last for the current page session - refresh to remove
Note: Bookmarklets are for testing only. For permanent accessibility compliance, install the helper script properly using one of the methods above.
Is it Secure?
DocAccess limits its permissions and follows industry-standard cybersecurity protocols to ensure your site remains secure.
- Limited Permissions: The script only:
- Inventories site links to pdf files
- Fetches a site link manifest from docaccess.com/domains/[yourdomain.org]/domain.json
- Adds special click actions only to documents that are enabled for DocAccess, based on an exact list (whitelist) provided in your site's manifest
- Loads asynchronously, so it doesn't slow down your site and only works in the background when your site is finished loading.
- Strict Security Practices: We follow industry-standard cybersecurity protocols
- We use HTTPS and HSTS for all connections using strict content security policies and limit cross origin resource sharing to docaccess.com domains.
- Our codebase is managed with strict version control and all changes require formal review and authorization. The DocAccess script is delivered via a secure, immutable CDN, protected by AWS CloudFront and an enterprise-grade web application firewall to ensure integrity and prevent unauthorized modifications.
- All permissions are solely used to ensure accessibility, prevent keyboard traps, and provide continuity of experience.
Cookies & Local Storage
Are cookies or local storage required?
No, cookies and local storage are not required for DocAccess to function. However, they enhance the user experience by:
- Remembering when users dismiss the AI warning dialog
- Storing acceptance of terms and conditions
- Maintaining user preferences for accessibility settings, like language translation
Without cookies/local storage, the experience is less convenient but not broken. Users may need to re-accept terms or dismiss warnings on each visit.
DocAccess will never share your site visitor's data with third parties, per our Privacy Policy.
Installation Options by Platform
You can install DocAccess using either the standard HTML script tag (Option 1) or the dynamic JavaScript approach (Option 2). Most platforms support both methods, but some may require one over the other.
Which option should I use?
- Use Option 1 (Standard HTML) when:
- You have direct access to edit your site's HTML header
- Your CMS allows custom HTML scripts
- You're using WordPress plugins, Drupal blocks, or similar
- Use Option 2 (Dynamic JavaScript) when:
- Your CMS restricts HTML but allows JavaScript
- You're using Google Tag Manager
- You're working with single-page applications (React, Vue, Angular)
- Your platform has strict Content Security Policies
Adding the Helper Script on WordPress
Note: For WordPress.com sites, you'll need a Business or Commerce plan to add custom code.
Method 1: Using a Plugin (Recommended)
- Install the "Insert Headers and Footers" plugin by WPCode
- Navigate to Settings → Insert Headers and Footers
- In the "Scripts in Header" section, paste either:
- The standard HTML script:
<script async src="https://docaccess.com/docbox.js"></script> - Or if HTML is not allowed, use the dynamic JavaScript approach (see Option 2 above)
- The standard HTML script:
- Click Save
Method 2: Theme Editor
- Go to Appearance → Theme Editor
- Select header.php
- Find the
</head>tag - Paste the DocAccess script just before
</head> - Click Update File
Video Tutorial: Watch how to install on WordPress
Important: Install the script exactly as provided. Please do not modify, self-host, bundle, minify, wrap, or otherwise alter the DocAccess helper script or its loading behavior. Modified implementations are not supported and may interfere with PDF detection, accessible viewing, security updates, and future compatibility.
Adding the Helper Script on Drupal
Method 1: Block System (Drupal 8/9/10)
- Log in to your Drupal admin panel.
-
Create a Custom Block:
- Navigate to Structure → Block layout → Custom block library.
- Click + Add custom block.
- Enter a Block description (e.g., "DocAccess Script").
- In the Body field, paste the following code:
<script async src="https://docaccess.com/docbox.js"></script>Alternative: If the HTML script doesn't work, try using the dynamic JavaScript approach:
<script> (function() { const docboxScript = document.createElement('script'); docboxScript.src = 'https://docaccess.com/docbox.js'; docboxScript.async = true; document.head.appendChild(docboxScript); })(); </script>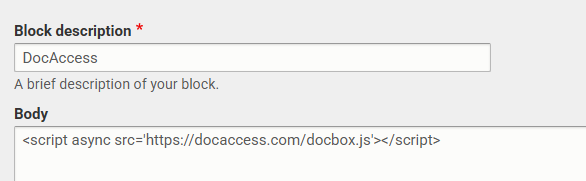
- Select "Full HTML" text format
- Click Save.
-
Place the Block in the Header:
- Go to Structure → Block layout.
- Find the Header region and click Place block.
- Select your "DocAccess Script" block and configure visibility as needed.
- Click Save blocks.
-

- Clear your site cache to ensure the script loads on all pages.
- Test your site to confirm the DocAccess script is active.
Method 2: Theme Template
- Access your theme files via FTP or file manager
- Open
themes/your-theme/templates/html.html.twig - Add the script before
</head> - Clear Drupal cache
Method 3: Libraries API
- Edit your theme's
.libraries.ymlfile - Add the external script reference
- Attach the library globally in your theme
- Clear cache
Important: Install the script exactly as provided. Please do not modify, self-host, bundle, minify, wrap, or otherwise alter the DocAccess helper script or its loading behavior. Modified implementations are not supported and may interfere with PDF detection, accessible viewing, security updates, and future compatibility.
Adding the Helper Script on Streamline
Easy Installation! Streamline sites have built-in support for DocAccess.
- Log into your DocAccess dashboard
- Navigate to your Sites section
- Find your Streamline domain
- Toggle the switch to "Enable"
- DocAccess will be automatically activated on your Streamline site
Note: No manual code installation needed! The integration is handled automatically through the Streamline platform.
Important: Install the script exactly as provided. Please do not modify, self-host, bundle, minify, wrap, or otherwise alter the DocAccess helper script or its loading behavior. Modified implementations are not supported and may interfere with PDF detection, accessible viewing, security updates, and future compatibility.
Adding the Helper Script on Granicus/Civica/Vision Internet
Note: These instructions were provided by customers using Granicus. Use caution when updating your site. Some Granicus configurations may require administrator approval for custom scripts. Contact Granicus support for any questions on using their software.
- Log into your Granicus CMS.
-
Go to Configurations → Custom Content.
For more details, see the Granicus Custom Content documentation. - Click Add Custom Content.
-
In the Title field, enter
DocAccess helper script.
Set the Type to Regular and select the HTML option.
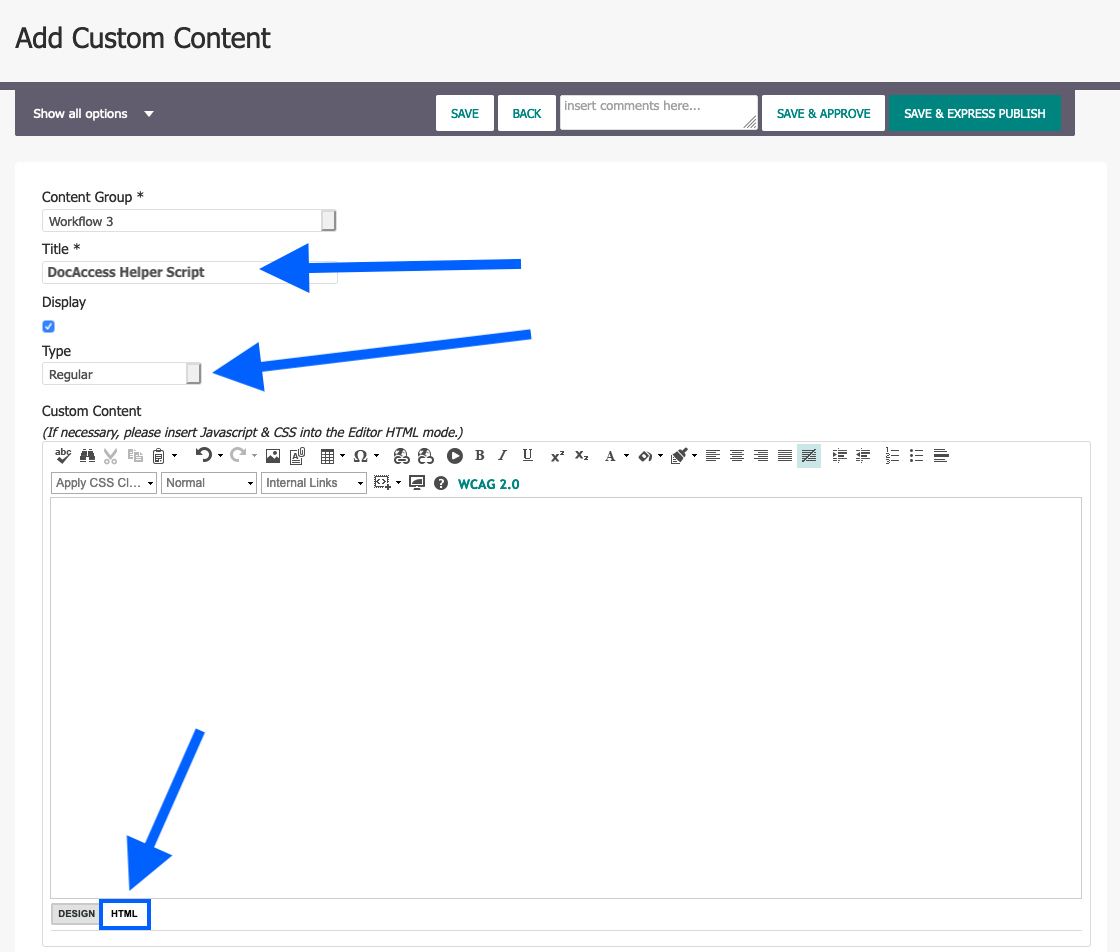
-
In the HTML editor, paste the following code:
<script async src="https://docaccess.com/docbox.js"></script>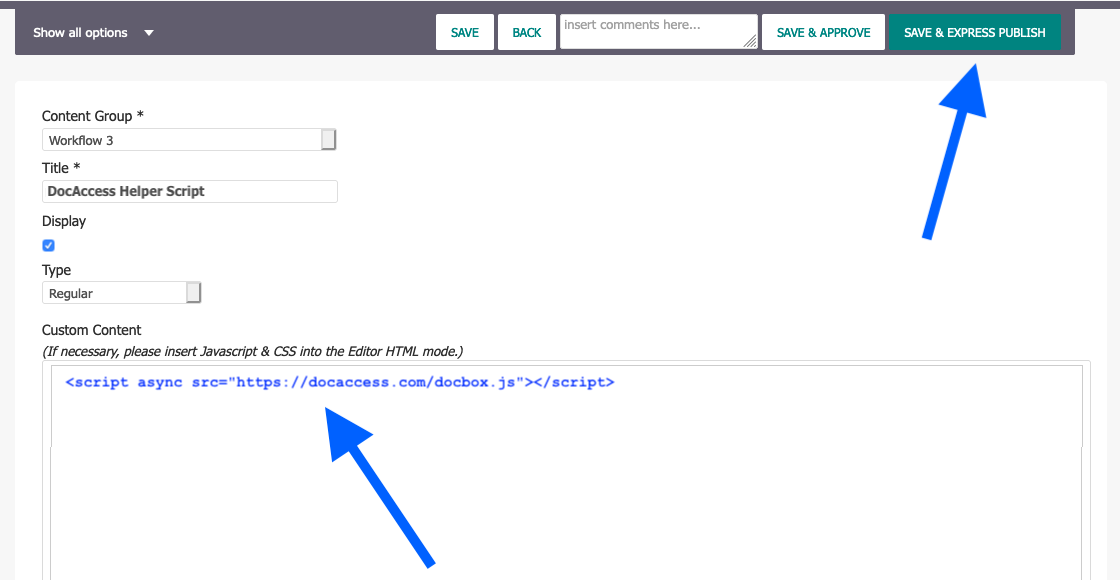
- Click Save and Express Publish to make the changes live or just Save, if you're not ready to publish.
Important: Install the script exactly as provided. Please do not modify, self-host, bundle, minify, wrap, or otherwise alter the DocAccess helper script or its loading behavior. Modified implementations are not supported and may interfere with PDF detection, accessible viewing, security updates, and future compatibility.
Adding the Helper Script on CivicPlus
Platform Note: CivicPlus offers two different website platforms. Choose the instructions that match your system:
Platform Note: Municipal Websites Open (formerly CivicEngage/CivicPlus) is built on Drupal. The recommended way to add the DocAccess helper script is by creating a custom Drupal block and placing it in your site's header. See Drupal instructions for additional details.
- Log in to your Municipal Websites Open (CivicPlus) admin panel.
-
Create a Custom Block:
- Navigate to Structure → Block layout → Custom block library.
- Click + Add custom block.
- Enter a Block description (e.g., "DocAccess Script").
- In the Body field, paste the following code:
<script async src="https://docaccess.com/docbox.js"></script>
- Select "Full HTML" text format
- Click Save.
-
Place the Block in the Header:
- Go to Structure → Block layout.
- Find the Header region and click Place block.
- Select your "DocAccess Script" block and configure visibility as needed.
- Click Save blocks.
-
- Clear your site cache to ensure the script loads on all pages.
- Test your site to confirm the DocAccess script is active.
If you do not have full permissions on your site, you may need to contact CivicPlus support or use Google Tag Manager (if installed) to add the helper script yourself. See Google Tag Manager instructions for additional details.
Important: Install the script exactly as provided. Please do not modify, self-host, bundle, minify, wrap, or otherwise alter the DocAccess helper script or its loading behavior. Modified implementations are not supported and may interfere with PDF detection, accessible viewing, security updates, and future compatibility.
DocAccess on CivicPlus Central
No code changes needed. DocAccess is automatically pre-installed on all CivicPlus Central sites. To activate it, contact your DocAccess account manager or support@docaccess.com.
Important: Install the script exactly as provided. Please do not modify, self-host, bundle, minify, wrap, or otherwise alter the DocAccess helper script or its loading behavior. Modified implementations are not supported and may interfere with PDF detection, accessible viewing, security updates, and future compatibility.
Adding the Helper Script on Revize
- Log into your Revize CMS
- Navigate to Settings → Site Settings
- Click on Header/Footer Code
- In the "Header Code" field, paste the DocAccess script
- Save your changes
- The script will be active immediately
Tip: Revize CMS typically allows custom scripts without additional approval.
Important: Install the script exactly as provided. Please do not modify, self-host, bundle, minify, wrap, or otherwise alter the DocAccess helper script or its loading behavior. Modified implementations are not supported and may interfere with PDF detection, accessible viewing, security updates, and future compatibility.
Adding the Helper Script on GoDaddy
Important: GoDaddy Website Builder currently prohibits custom code insertion on their platform. Neither the standard HTML script nor the dynamic JavaScript approach will work.
Available Options:
- Contact GoDaddy Support: Request an exception to add custom code to your site
- Use Alternative Hosting: Explore Alternative Hosting Options: Consider migrating to a platform such as CivicPlus that supports custom code, advanced website functionality, and migration assistance.
Alternative: See the "Alternatives to Installation" section below for options that don't require code installation.
Important: Install the script exactly as provided. Please do not modify, self-host, bundle, minify, wrap, or otherwise alter the DocAccess helper script or its loading behavior. Modified implementations are not supported and may interfere with PDF detection, accessible viewing, security updates, and future compatibility.
Adding the Helper Script on Wix
Note: You'll need a paid Wix plan to add custom code.
- In your Wix Editor, click Settings (gear icon)
- Select Custom Code under "Advanced"
- Click + Add Custom Code
- Paste one of the following in the code snippet box:
- Standard HTML:
<script async src="https://docaccess.com/docbox.js"></script> - Dynamic JavaScript: Use the JavaScript code from Option 2 above
- Standard HTML:
- Name it "DocAccess"
- Select "Head" for placement
- Choose "Load on all pages"
- Click Apply
Important: Wix free plans don't support custom code. You'll need to upgrade to a paid plan.
Important: Install the script exactly as provided. Please do not modify, self-host, bundle, minify, wrap, or otherwise alter the DocAccess helper script or its loading behavior. Modified implementations are not supported and may interfere with PDF detection, accessible viewing, security updates, and future compatibility.
Adding the Helper Script on SquareSpace
Note: Requires a Business plan or higher to add script.
Here's a video: Watch how to add header scripts ("inject code") on SquareSpace
- Go to Settings → Advanced → Code Injection
- In the "Header" section, paste the DocAccess script
- Click Save
- The script will be active on all pages immediately
Important: Install the script exactly as provided. Please do not modify, self-host, bundle, minify, wrap, or otherwise alter the DocAccess helper script or its loading behavior. Modified implementations are not supported and may interfere with PDF detection, accessible viewing, security updates, and future compatibility.
Adding DocAccess to Agenda and Meeting Management Select
Automatic Integration! DocAccess automatically integrates with Agenda and Meeting Management Select portals.
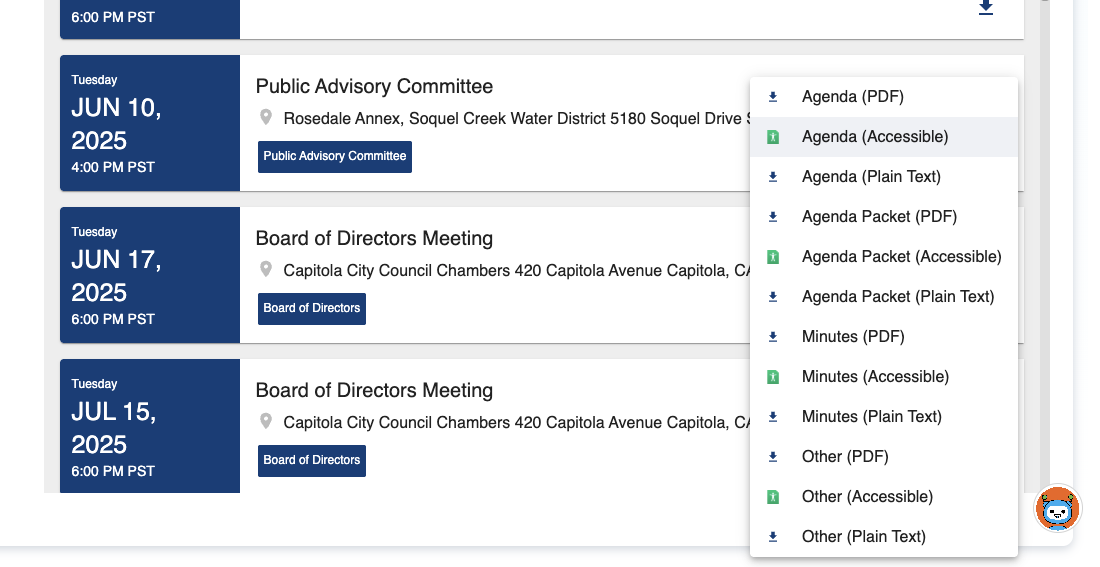
DocAccess automatically detects and enhances PDF documents in your Agenda and Meeting Management Select portal. When enabled documents are found:
- A new "(Accessible)" option appears alongside each PDF document
- The DocAccess favicon is displayed next to accessible documents
- Clicking the accessible option opens the document in the DocAccess viewer
Note: Only PDF documents that have been processed and enabled in DocAccess will show the accessible option. New documents may take a few minutes to appear.
Important: Install the script exactly as provided. Please do not modify, self-host, bundle, minify, wrap, or otherwise alter the DocAccess helper script or its loading behavior. Modified implementations are not supported and may interfere with PDF detection, accessible viewing, security updates, and future compatibility.
- Log in to the Apptegy CMS.
- Navigate to: CMS → Settings → Custom Code → Other Custom Code
- In the empty block that says “Start typing your code here…”, paste the DocAccess helper script.
- Save/publish the change.
- Open the public website and refresh the homepage.
- Once installed, DocAccess will automatically detect public PDF links on the Apptegy site and route them through the accessible DocAccess viewer.
Important: Install the script exactly as provided. Please do not modify, self-host, bundle, minify, wrap, or otherwise alter the DocAccess helper script or its loading behavior. Modified implementations are not supported and may interfere with PDF detection, accessible viewing, security updates, and future compatibility.
Google Drive Integration
Automatic Transformation! DocAccess automatically converts Google Drive embedded folders into accessible document interfaces.
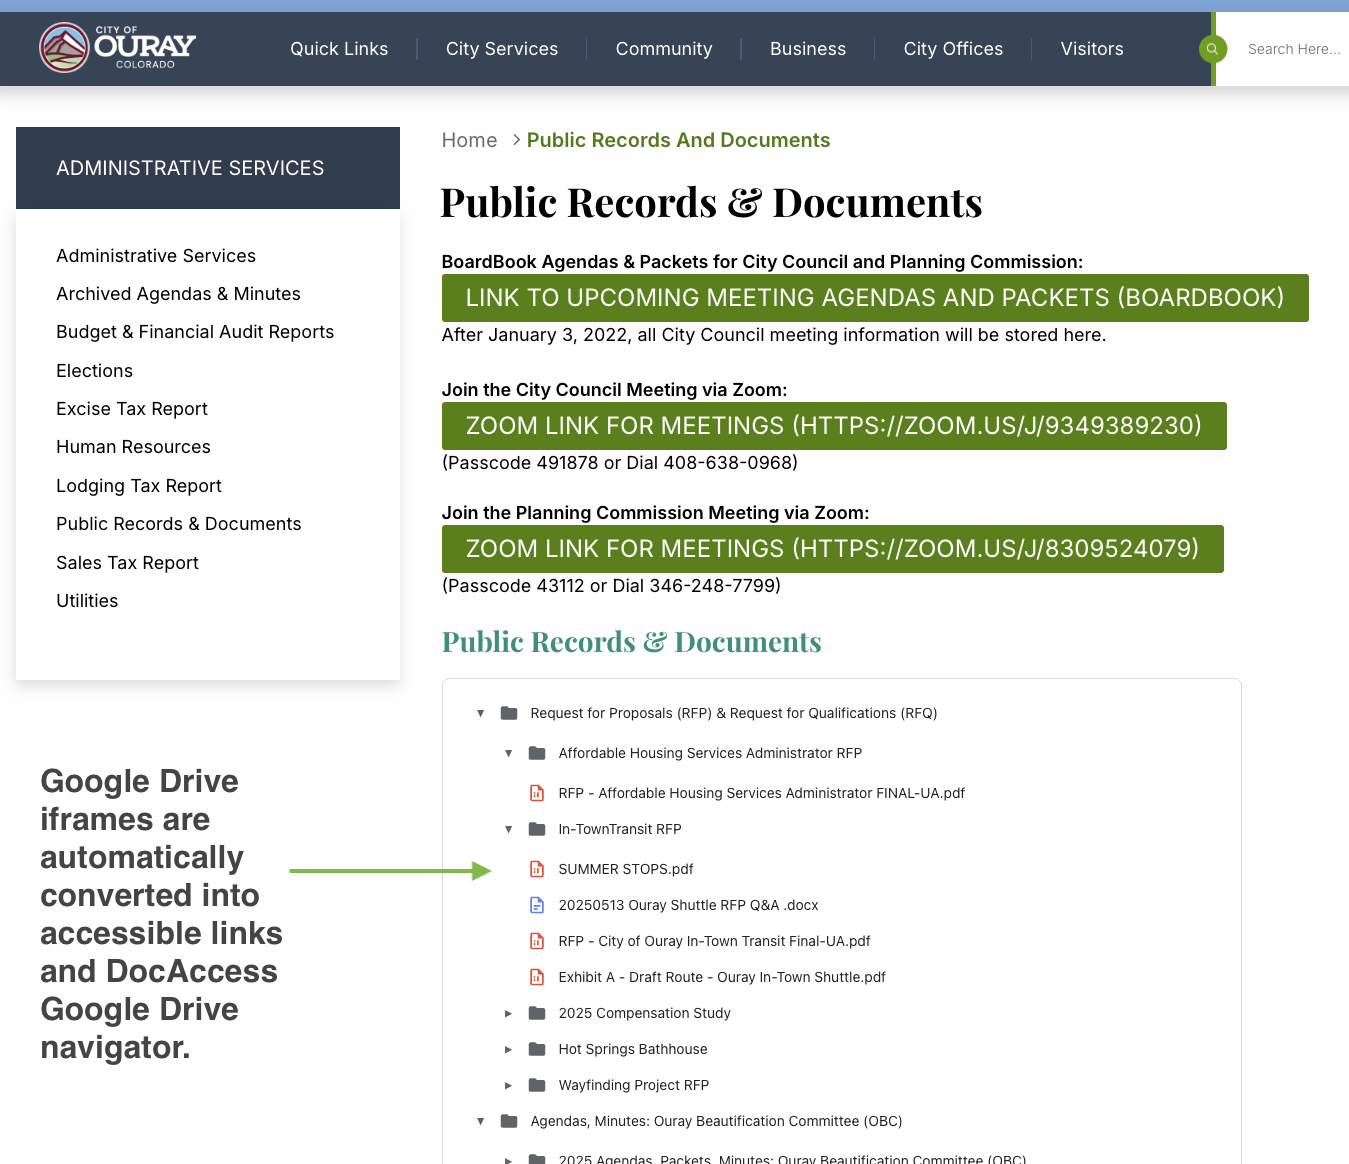
How It Works
When the DocAccess helper script is installed on your website:
- Google Drive embedded folder iframes are automatically detected
- The iframe is replaced with an accessible DocAccess widget
- Users can navigate folders and open documents directly in the DocAccess viewer
- All Google Drive document types are supported (PDFs, Docs, Sheets, Slides)
Supported Google Drive URLs
DocAccess processes various Google Drive URL formats:
drive.google.com/file/d/FILE_ID/viewdrive.google.com/open?id=FILE_IDdrive.google.com/embeddedfolderview?id=FOLDER_IDdocs.google.com/document/d/FILE_ID/editdocs.google.com/spreadsheets/d/FILE_ID/edit(will be supported in the future)docs.google.com/presentation/d/FILE_ID/edit(will be supported in the future)
Features of the Google Drive Widget
- Interactive folder navigation with expand/collapse
- File type icons for visual identification
- Direct download links converted to accessible format
- Full keyboard navigation and screen reader support
- Responsive design for all devices without fixed iframe height gap
- Automatic DocAccess integration for PDFs
Manual Implementation
To manually add a Google Drive folder widget to your page:
Privacy Note: The widget uses the official Google Drive API and includes
a default API key for convenience. For high-traffic sites, you may want to use your own
API key by adding &apiKey=YOUR_KEY to the script URL.
Google Drive Permissions
Important: DocAccess requires "Anyone on the internet" permission for Google Drive folders due to API limitations.
Why This Limitation Exists
When DocAccess encounters a Google Drive iframe or when you use the DocAccess script tag:
- It replaces the Google Drive viewer with the DocAccess widget
- The widget uses the Google Drive API to fetch folder contents
- Google's API requires full public access when using API keys (without OAuth)
- "Anyone with the link" is NOT sufficient
- You must use "Anyone on the internet"
How to Set Full Public Access
- Open your Google Drive folder
- Click the "Share" button
- Under "General access", select "Anyone on the internet"
- Set the permission level to "Viewer"
- Click "Done" to save
Why this limitation exists: The Google Drive API v3 requires full public access when using API keys. This is a Google limitation, not a DocAccess limitation. The embedded viewer works differently because it runs in the browser context.
Alternatives If You Can't Use Full Public Access
If you cannot make your Google Drive folder fully public ("Anyone on the internet"), here are your options:
Option 1: Use Google Drive Without DocAccess Enhancement
If you need to keep "Anyone with the link" permissions:
- Don't install the DocAccess helper script on pages containing Google Drive iframes
- Or place the Google Drive iframe on a separate page without the DocAccess script
- Note: This means you won't get DocAccess accessibility features for these documents
Option 2: Upload Documents Directly to DocAccess
For the best accessibility and control:
- Upload your documents directly to the DocAccess dashboard
- Use DocAccess's built-in document management
- Get direct accessible links for each document
- No Google Drive permission issues
Converting from YouNeedAWiki to DocAccess
If you're currently using YouNeedAWiki embeds and want to switch to DocAccess for better accessibility features:
Step 1: Extract the Google Drive ID
From a YouNeedAWiki iframe like this:
The Google Drive ID is: 1MqOY1LE0CAi1umXVI6QvD0-jFPP_81L-
Step 2: Replace with DocAccess Embed
Replace the entire iframe with this script tag:
Benefits of switching:
- Full accessibility compliance with WCAG 2.1 AA standards
- Screen reader support and keyboard navigation
- Automatic PDF processing and text extraction
- Built-in AI assistance for document understanding
- No third-party dependencies beyond Google Drive
Important: Install the script exactly as provided. Please do not modify, self-host, bundle, minify, wrap, or otherwise alter the DocAccess helper script or its loading behavior. Modified implementations are not supported and may interfere with PDF detection, accessible viewing, security updates, and future compatibility.
SharePoint Integration
Automatic Transformation! DocAccess turns SharePoint links on your page into accessible documents — the same way it handles Google Drive. Both folders and individual files are supported.
How It Works
Once the DocAccess helper script is on your website, it automatically detects SharePoint share links and enhances them. No other changes are needed.
Folders — an accessible document browser
When a link points to a shared SharePoint folder (an /:f:/
share link), clicking it opens a clean, accessible pop-up listing the documents in that
folder. From there a single click opens any document.
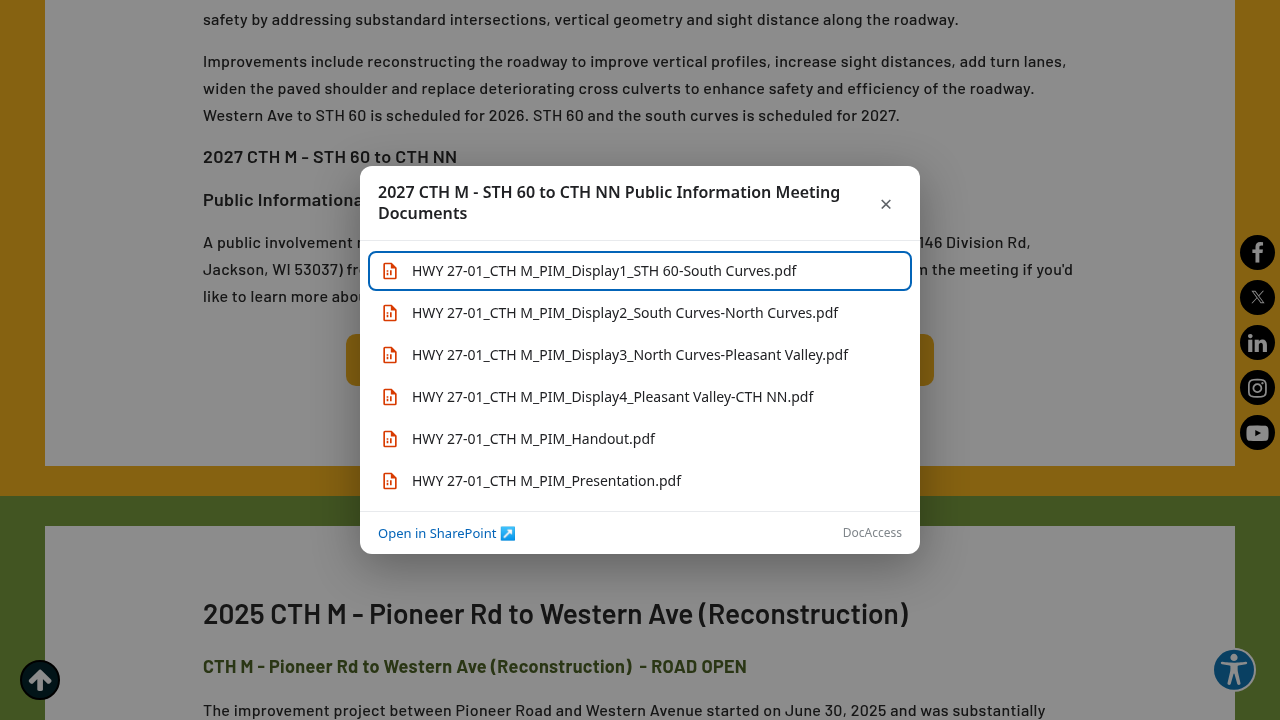
- Opens in an isolated pop-up, so it looks and works the same on any page or theme
- Fully keyboard- and screen-reader-accessible (labelled dialog, focus handling, Esc to close)
- Always offers an “Open in SharePoint” fallback
Files — the accessible DocAccess viewer
Individual SharePoint file links (a /:b:/ share link), and the documents opened
from a folder, are processed for accessibility and open in the DocAccess viewer — with an
accessible transcript, document outline, translation, “Ask a Question,” and a
link to the original PDF.
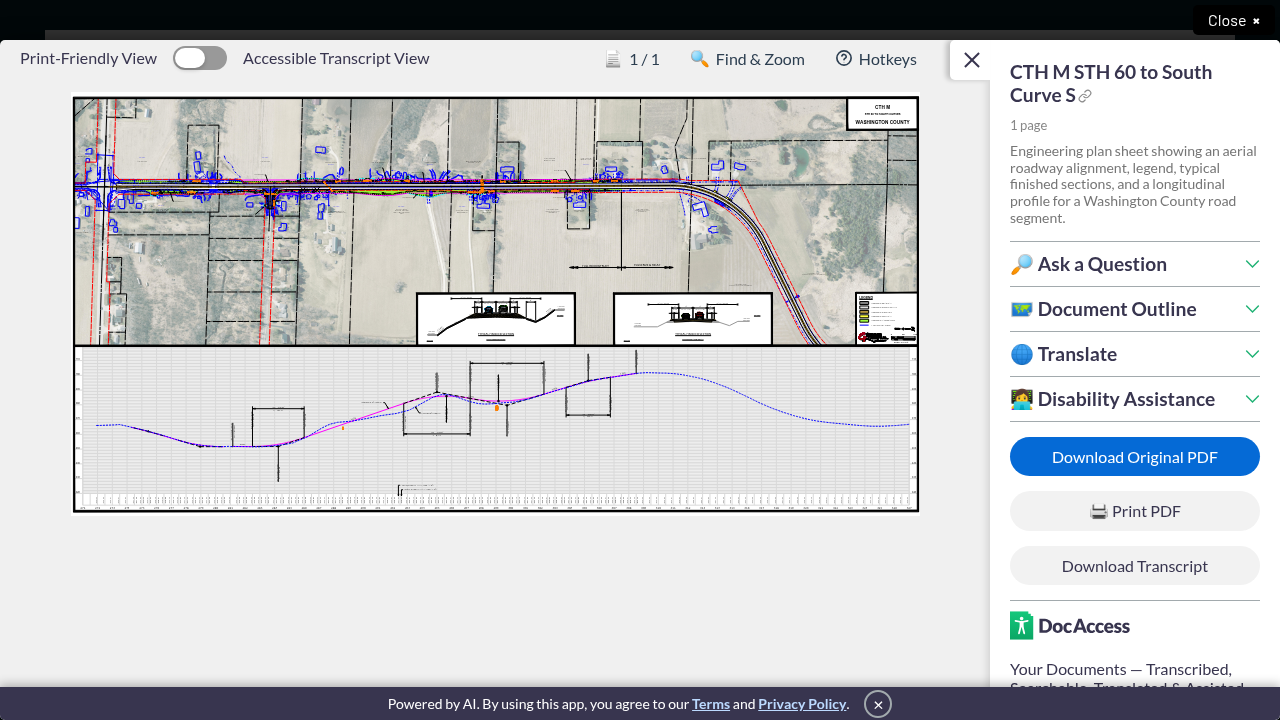
Until a document has finished processing it opens as the normal PDF; once processed it opens in the accessible viewer automatically.
Manual Implementation
To add a single SharePoint folder browser to a page directly, use a script tag pointing at the folder's share URL:
SharePoint Permissions
Important: DocAccess reads shared content anonymously, so the folder or file must be shared with “Anyone with the link” (no sign-in required).
- Open the folder or file in SharePoint / OneDrive
- Click Share
- Set access to “Anyone with the link” (View)
- Copy the link and use it on your page
Content restricted to “People in your organization” or specific people cannot be read anonymously and will not be enhanced.
Supported SharePoint URLs
tenant.sharepoint.com/:f:/s/Site/…— a shared folder (opens the document browser)tenant.sharepoint.com/:b:/s/Site/…— a shared file (opens in the accessible viewer once processed)
Important: Install the script exactly as provided. Please do not modify, self-host, bundle, minify, wrap, or otherwise alter the DocAccess helper script or its loading behavior. Modified implementations are not supported and may interfere with PDF detection, accessible viewing, security updates, and future compatibility.
Adding the Helper Script via Google Tag Manager
Great Alternative! If your site already has Google Tag Manager installed, this is an excellent way to add DocAccess without editing your site's code directly.
- Log into your Google Tag Manager account
- Select your container
- Click New Tag
- Click Tag Configuration
- Choose Custom HTML
- Paste the following JavaScript code in the HTML field:
<script> (function() { const docboxScript = document.createElement('script'); docboxScript.src = 'https://docaccess.com/docbox.js'; docboxScript.async = true; document.head.appendChild(docboxScript); })(); </script>
- Click Triggering
- Select All Pages
- Name your tag "DocAccess Script"
- Click Save
- Click Submit to publish
- Add a version name like "Added DocAccess"
- Click Publish
Note: Google Tag Manager requires the dynamic JavaScript approach wrapped in script tags, as shown above.
Tip: This method works for any CMS that has GTM installed, even if direct code editing is restricted.
Important: Install the script exactly as provided. Please do not modify, self-host, bundle, minify, wrap, or otherwise alter the DocAccess helper script or its loading behavior. Modified implementations are not supported and may interfere with PDF detection, accessible viewing, security updates, and future compatibility.
Canvas uses an LTI 1.3 integration rather than a plain <script> tag. Follow the guided setup to connect your Canvas instance.
What the setup wizard walks you through
- Create an LTI Developer Key in Canvas (Admin → Developer Keys → + LTI Key) and paste the DocAccess configuration URL.
- Enable the key and install the DocAccess app By Client ID under Admin → Settings → Apps.
- Add the DocAccess helper script (
canvas.js) to your Canvas theme JavaScript. - Grant DocAccess read access to Canvas files via a scoped Developer Key or a Personal Access Token.
- Return to the setup page and enter your Client ID, Deployment ID, and file-access credentials.
Note: Installation status for Canvas domains is determined by whether an active LTI platform is configured — not by crawling the site for a script tag.
Important: Install the script exactly as provided. Please do not modify, self-host, bundle, minify, wrap, or otherwise alter the DocAccess helper script or its loading behavior. Modified implementations are not supported and may interfere with PDF detection, accessible viewing, security updates, and future compatibility.
Adding DocAccess to CivicPlus Evolve
Contact CivicPlus Support: CivicPlus Evolve is a newer platform. Contact CivicPlus support to request they add the DocAccess helper script to your site header.
What to Request
Ask CivicPlus to add the following script to your site's header:
Alternative: If your site has Google Tag Manager installed, you can add DocAccess through GTM without contacting CivicPlus. See the Google Tag Manager guide.
Important: Install the script exactly as provided. Please do not modify, self-host, bundle, minify, wrap, or otherwise alter the DocAccess helper script or its loading behavior. Modified implementations are not supported and may interfere with PDF detection, accessible viewing, security updates, and future compatibility.
Adding DocAccess to CMS4Schools
Contact CMS4Schools Support: To add the DocAccess helper script to your CMS4Schools-powered website, you'll need to contact CMS4Schools support and request they add the script to your site.
What to Request from CMS4Schools
Send the following message to CMS4Schools support:
Important: Install the script exactly as provided. Please do not modify, self-host, bundle, minify, wrap, or otherwise alter the DocAccess helper script or its loading behavior. Modified implementations are not supported and may interfere with PDF detection, accessible viewing, security updates, and future compatibility.
eScribe integration is on the roadmap — no customer-side install is available yet. Agenda PDFs and supporting documents served from pub-{tenant}.escribemeetings.com are already discoverable via DocAccess crawling when linked from a customer's primary website. Reach out to support@docaccess.com if you need a native integration prioritised.
Important: Install the script exactly as provided. Please do not modify, self-host, bundle, minify, wrap, or otherwise alter the DocAccess helper script or its loading behavior. Modified implementations are not supported and may interfere with PDF detection, accessible viewing, security updates, and future compatibility.
Adding the Helper Script on FinalSite
- Navigate to the Composer section in the FinalSite CMS editor
- Navigate to Themes → External Assets
- In the "External Assets" section, paste the following:
- The standard HTML script:
<script async src="https://docaccess.com/docbox.js"></script> - Click Save
Important: Install the script exactly as provided. Please do not modify, self-host, bundle, minify, wrap, or otherwise alter the DocAccess helper script or its loading behavior. Modified implementations are not supported and may interfere with PDF detection, accessible viewing, security updates, and future compatibility.
- Sign in to your Foxbright CMS Admin Portal using an account with administrative permissions.
- Navigate to Script Blocks from the Admin Portal. Navigate to: Configuration → System → Script Blocks. This page allows you to add custom scripts that load across your website.
- On the Script Blocks page, find the Content section. Within this section, locate the field labeled Head Script Block.
- Paste the entire script into the Head Script Block field.
- Note: If other scripts already exist in this field, do not remove or replace them. Simply paste the DocAccess helper script on a new line after the existing content.
- Once the script has been added, click Save at the top of the page.
- After saving, allow a few moments for the changes to take effect and click "Check Installation" on your Installations tab in DocAccess.
Important: Install the script exactly as provided. Please do not modify, self-host, bundle, minify, wrap, or otherwise alter the DocAccess helper script or its loading behavior. Modified implementations are not supported and may interfere with PDF detection, accessible viewing, security updates, and future compatibility.
No customer-side install needed for PDF discovery — docbox.js auto-discovers PrimeGov compiled-document links on the customer's primary site as long as the standard helper script is installed there.
Important: Install the script exactly as provided. Please do not modify, self-host, bundle, minify, wrap, or otherwise alter the DocAccess helper script or its loading behavior. Modified implementations are not supported and may interfere with PDF detection, accessible viewing, security updates, and future compatibility.
Laserfiche WebLink Integration
Automatic Integration! DocAccess automatically detects and integrates with Laserfiche WebLink document management systems.
When DocAccess encounters a Laserfiche WebLink page, it provides accessible versions of documents.
How It Works
- Install the DocAccess helper script on the page that links to your WebLink system
- DocAccess detects Laserfiche WebLink URLs
- Documents are automatically processed and made accessible
Supported WebLink URL Patterns
/WebLink/DocView.aspx/WebLink/Browse.aspx/WebLink/ElectronicFile.aspx
Live Example:
- records.cupertino.org — City of Cupertino, CA
Important: Install the script exactly as provided. Please do not modify, self-host, bundle, minify, wrap, or otherwise alter the DocAccess helper script or its loading behavior. Modified implementations are not supported and may interfere with PDF detection, accessible viewing, security updates, and future compatibility.
Install the DocAccess helper script site-wide on the Liferay site. Two common paths (require Liferay admin access):
- Add the script tag to the active theme template (e.g.
portal_normal.ftl), so it loads on every page; or - Inject it through a site-wide Custom HTML / JavaScript fragment applied to all pages.
Live example: City of Burbank (burbankca.gov).
Important: Install the script exactly as provided. Please do not modify, self-host, bundle, minify, wrap, or otherwise alter the DocAccess helper script or its loading behavior. Modified implementations are not supported and may interfere with PDF detection, accessible viewing, security updates, and future compatibility.
Schoology integration is on the roadmap — no customer-side install is available yet. Schoology-hosted content (app.schoology.com) typically requires login and is not currently crawled. Reach out to support@docaccess.com if you need this prioritised.
Important: Install the script exactly as provided. Please do not modify, self-host, bundle, minify, wrap, or otherwise alter the DocAccess helper script or its loading behavior. Modified implementations are not supported and may interfere with PDF detection, accessible viewing, security updates, and future compatibility.
Integrating DocAccess in Your Own Application
If you're building a custom web application or using a JavaScript framework like React, Vue, or Angular, you can integrate DocAccess directly.
Option 1: Standard Links (Recommended)
The simplest way to integrate is with standard HTML anchor tags. DocAccess automatically detects links to PDF files and enhances them:
That's it. When the DocAccess helper script is loaded on the page, it will find this link and make the document accessible. No additional attributes or configuration needed.
Option 2: Custom Elements with data-docaccess-url
If your application renders documents through buttons, cards, table rows, or other non-link elements, add the data-docaccess-url attribute to tell DocAccess which document the element refers to:
DocAccess will detect these elements, make them clickable, and open the document in the accessible viewer when activated.
Your data-docaccess-url value is treated as the source of truth and is never overwritten. You can use relative paths (/docs/x.pdf), protocol-relative URLs (//cdn.example.com/x.pdf), or absolute URLs — DocAccess resolves a local copy for processing but leaves your attribute untouched, so server-side renders, WYSIWYG saves, and per-environment URL setups stay intact.
Framework Examples
React:
Vue:
Option 3: Embedded Iframes
If your site embeds documents in iframes, DocAccess can automatically replace the raw PDF with the accessible viewer. There are two ways this works:
Automatic: If the iframe src points to an enabled document, the helper script will detect it and swap in the accessible viewer automatically — no extra markup needed.
Explicit: Add the data-docaccess-url attribute to an iframe to tell DocAccess which document to display:
The original src is preserved in a data-docaccess-original-src attribute for reference.
Source URL Requirements
Source URLs must be stable, permanent links that are publicly accessible.
- DocAccess identifies documents by generating a SHA-256 hash of the URL. If the URL changes, DocAccess will treat it as a new document and need to re-download and process the file.
- Avoid URLs with session tokens, expiring signatures, or cache-busting parameters.
- Good:
https://example.gov/reports/budget-2025.pdf - Avoid:
https://example.gov/download?token=abc123&ts=1710...
Automatic Version Detection
DocAccess automatically detects when a document at the same URL has been updated by comparing its SHA-256 file hash against the previously captured version. When a change is detected:
- A notice will appear for the user on their document letting them know that a new version is available (and/or processing) with a link to that version when ready.
- DocAccess begins processing the new version of the file
- The previous accessible version remains available until the new version is ready
Documents that change frequently are subject to an exponential cooldown to prevent excessive reprocessing. You can disable new version detection entirely for a domain in your Domain Control Panel settings.
Testing Your Integration
We recommend testing your integration using the DocAccess bookmarklets before deploying the helper script. Bookmarklets let you activate DocAccess on any page temporarily without installing the script permanently.
Install the DocAccess bookmarklets — drag them to your bookmarks bar, then visit your application and click the bookmarklet to verify your links and data-docaccess-url elements are detected correctly.
REST API
DocAccess features a robust, RESTful API for programmatic integration. API documentation is available within your Control Center when API access is enabled for your account. Contact support@docaccess.com to request API access.
Important: Install the script exactly as provided. Please do not modify, self-host, bundle, minify, wrap, or otherwise alter the DocAccess helper script or its loading behavior. Modified implementations are not supported and may interfere with PDF detection, accessible viewing, security updates, and future compatibility.
Alternatives to Adding the Helper Script
If you cannot add the DocAccess script on your website, here are some alternatives:
Create a dedicated page that lists all your accessible documents in one place.
- Log into your DocAccess dashboard
- Navigate to your domain settings
- Use the provided Document List URL
- Link to this page from your main website in a conspicuous location
This provides users with a centralized location to access all your accessible documents without requiring the helper script.
Share direct links to specific accessible documents.
- Upload your documents to DocAccess
- Get the accessible URL for each document
- Use these URLs directly in emails, social media, or your website
Each document will have its own accessible URL that works without the script installed.
Send accessible document links via email to stakeholders who need them.
- Access your DocAccess dashboard
- Select the documents you want to share
- Use the "Email Links" feature
- Recipients can access documents directly from their email
- You can even specify a default language for the document, if needed
Troubleshooting
If you're having trouble with DocAccess, here are some common issues and solutions:
If DocAccess reports the script is not installed:
- Try inspecting the page yourself by clicking "View Source" in your browser and search for docaccess.com.
- If you used the dynamic JavaScript approach (Option 2), the script won't appear in the source code but should still work. Check the browser's Developer Console (F12) to see if docbox.js is loaded
- Check that you've saved/published your changes
- If you're sure you've added in the right spot, but it's not showing up, try editing content on your homepage. This can reset the page cache and cause it to update.
- Wait 5-10 minutes for CDN caches to update, if your website uses a CDN.
If clicking on PDFs doesn't open the accessible viewer:
- Ensure the documents have been uploaded to DocAccess
- Check that the documents are enabled in your dashboard
- Verify your domain is correctly configured
- Try a hard refresh (Ctrl+F5 or Cmd+Shift+R)
- Check browser console for any JavaScript errors
- Contact DocAccess support for assistance
If you used the dynamic JavaScript approach (Option 2) and it's not working:
- Make sure the code is wrapped in
<script>tags if required by your platform (e.g., Google Tag Manager) - Check for syntax errors - ensure all parentheses and curly braces are properly closed
- Verify the script URL is exactly:
https://docaccess.com/docbox.js - Check the browser's Developer Console (F12) for any error messages
- Some platforms may require the code to be in a specific format - contact support if you need help
If your site seems slower after installation:
- The DocAccess script loads asynchronously and shouldn't impact page load on your site
- If large documents are loading slowly, the DocAccess support team can show you some tricks to accelerate loading, including using 'Safe mode' which uses compressed images for the print-friendly version. However, DocAccess generally adapts to performance conditions and should always be snappy. Please report any problems to DocAccess support.
- Check for conflicts with other JavaScript libraries or browser plugins
- Contact support if issues persist
If your browser's developer console shows an error mentioning "Content Security Policy directive", your website has a CSP that's blocking DocAccess. The exact wording depends on which part is being blocked:
- Helper script blocked: "Loading the script 'https://docaccess.com/docbox.js' violates the following Content Security Policy directive: 'script-src ...'"
- Document viewer blocked: "Framing 'https://docaccess.com/' violates the following Content Security Policy directive: 'frame-src ...'. The request has been blocked."
- API calls blocked: "Refused to connect to 'https://docaccess.com/api/...' because it violates the following Content Security Policy directive: 'connect-src ...'"
What is Content Security Policy?
CSP is a security feature that restricts which external resources can run on your website. It's commonly used by enterprise CMS platforms like CivicPlus, Granicus, and ProudCity to prevent unauthorized code injection. Each directive controls a different category of resource — scripts, frames (iframes), network requests, images, and so on — and any source not explicitly listed is blocked.
Solution: Add DocAccess to Your CSP Allowlist
Your website administrator or CMS vendor needs to add DocAccess to three CSP directives. Request that they update the CSP header to include:
Each directive serves a specific purpose:
script-src— allows loading thedocbox.jshelper script that finds PDF links on your pages.frame-src— allows the accessible document viewer (docviewer.html) to load inside the lightbox iframe when a user clicks a PDF. Without this, clicking a document does nothing and a CSP error appears in the console.connect-src— allows the helper script to call DocAccess APIs to check which documents are processed and ready.
Note on frame-ancestors: This is a different directive that controls who can embed your site in an iframe — it does not affect DocAccess. You only need to update script-src, frame-src, and connect-src.
Email Template for Your CMS Vendor
Copy and send this to your website support team:
Alternative: If CSP changes aren't possible, consider using the Google Tag Manager approach or our Accessible Documents Page alternative.
If you need to quickly disable DocAccess on a specific page (for example, if it's causing a conflict), you can add a "killswitch" element to that page:
This element can be placed anywhere on the page and will prevent DocAccess from loading. It's useful for:
- Quickly disabling DocAccess while troubleshooting an issue
- Pages where DocAccess conflicts with other scripts
- Temporary workaround until a permanent fix is applied
Note: For a permanent solution, you can also exclude specific paths in your DocAccess domain settings. Contact support for help with path exclusions.
Contact Support — (916) 562-2811
We're here to help!
Fill out the form below and our support team will get back to you within 24 hours.